
How to Create an Ecommerce Website in India: 10 Steps (2026)
How to create an ecommerce website in India in 10 steps: GST, domain, platform, Razorpay, Shiprocket, policies, testing and launch.

Table of contents
- Before you start: what you need ready
- Step 1: Sort out the business basics
- Step 2: Pick and buy a domain
- Step 3: Choose your platform
- Step 4: Set up payments
- Step 5: Set up shipping
- Step 6: Prepare product content
- Step 7: Write your store policies
- Step 8: Design the store for mobile first
- Step 9: Test with real orders
- Step 10: Launch and set up basic SEO
- How long does it take to create an ecommerce website?
- Must-have pages and features checklist
- Example: launching a small clothing brand
- The first 30 days after launch
- Do it yourself or hire a developer?
- Common mistakes we see
- Keep your store safe
- What it costs
- Frequently asked questions
- Can I create an ecommerce website for free in India?
- Do I need GST to start an online store?
- Which payment gateway is best for a new store?
- Can I sell on my website and on Amazon or Flipkart together?
- Do I need a mobile app as well as a website?
- How do I get my first customers?
- Need help creating your store?
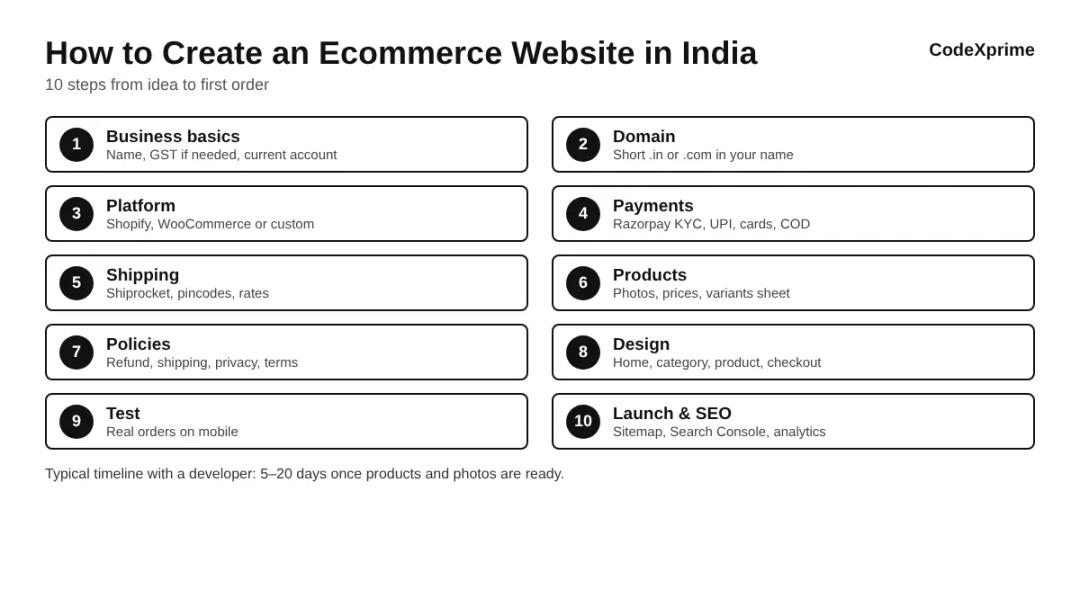
To create an ecommerce website in India, you need ten things in order: basic business setup, a domain, a platform (Shopify, WooCommerce or a custom store), a payment gateway like Razorpay, a shipping partner like Shiprocket, product content, store policies, a mobile-friendly design, real test orders, and a launch plan with basic SEO. With products and photos ready, a developer can usually take you from step 2 to launch in 5 to 20 days.
Most guides on this topic are written by website builders who want you on their platform. This one is written from the developer's side. At CodeXprime we build online stores for Indian businesses, and these are the steps we walk every client through, including the boring ones that delay launches.
Before you start: what you need ready
A clear list of what you will sell first (start with your best 20 to 50 products)
A business bank account in the business name, which payment gateways usually ask for
PAN and, if applicable, GST registration
Product photos, prices, sizes or variants in one spreadsheet
A rough budget for the build and the first year of running costs
Not sure about the budget yet? Our guide on ecommerce website cost in India breaks it down.
Step 1: Sort out the business basics
Payment gateways and couriers will ask who is selling. Decide whether you are selling as a proprietor, partnership, LLP or company, and keep your PAN and bank details ready. Many online sellers in India need GST registration, depending on what and where they sell. Check with your CA or the official GST portal before launch, because GST rates also need to be set on your products.
Step 2: Pick and buy a domain
Choose a short name that is easy to say on a phone call and spell in a WhatsApp message. A .in or .com works fine for Indian customers. Buy it in your own name and keep the login yourself. This sounds obvious, but we still meet store owners whose domain is held by an old developer and can't be moved.
Step 3: Choose your platform
This is the biggest decision when you create an ecommerce website, because it affects your monthly costs, speed and what you can change later.
Shopify: fastest to launch and easy to run, with a monthly plan and paid apps for extra features.
WooCommerce: free plugin on WordPress, full control, but you handle hosting, updates and security.
Custom store (for example Next.js): no platform fee, fast pages and features built exactly for your business, at a higher build cost.
We compared these in detail in Shopify vs WooCommerce in India. Quick rule: small catalogue and need to launch this month, Shopify. Existing WordPress site, WooCommerce. B2B pricing or no platform fee, custom.

Step 4: Set up payments
Indian shoppers expect UPI, cards, netbanking and often cash on delivery. A payment gateway such as Razorpay handles online payments. Apply early, because activation needs KYC documents and a live website with policies and contact details. Check current fees on the Razorpay pricing page.
For cash on delivery, decide your rules now: COD for all pincodes or only some, a maximum order value, and whether to charge a small COD fee. These rules reduce fake orders and returns.
Step 5: Set up shipping
Unless you deliver locally yourself, a shipping aggregator such as Shiprocket lets you book pickups with several couriers from one dashboard and gives customers tracking links. Decide how you will charge shipping: free above a certain order value, a flat rate, or by weight. Add a pincode checker on the product page so buyers know before they order whether you deliver to them.
Step 6: Prepare product content
Good product content sells more than a fancy design. For each product you need:
A clear name that includes what it is (not just a code)
Three to six real photos from different angles, on a plain background
Price, sizes, colours or weights, and stock count
A short description that answers what buyers ask you on WhatsApp
Delivery time and return rules close to the Add to Cart button
Put all of this in one spreadsheet. It is the single biggest thing that speeds up the build.
Step 7: Write your store policies
Payment gateways usually check for these pages before activating your account, and customers look for them before paying: refund and cancellation policy, shipping policy, privacy policy, terms and conditions, and a contact page with phone, email and business address. Keep them simple and honest. If you don't accept returns on some items, say so clearly.
Step 8: Design the store for mobile first
Most Indian shoppers browse on a phone, often on mobile data. Design every page for a small screen first: a clear home page, easy category filters, product pages with big photos, and a checkout with as few steps as possible. Add a WhatsApp button for buyers who want to ask before ordering. Keep fonts readable and avoid pop-ups that block the screen.
Step 9: Test with real orders
Before launch, place real orders from a phone, not a laptop on office Wi-Fi. Test each payment method, a COD order, a cancellation and a refund. Check that the order email reaches the customer, the invoice shows your GST details, the courier pickup is created and the tracking link works. Fix anything that confuses you, because it will confuse customers too.
Step 10: Launch and set up basic SEO
When the store goes live, connect it to Google Search Console and submit your sitemap so Google can find your pages. Add Google Analytics to see where visitors come from. Give every category and product a proper title and description, and make sure images have alt text. Then share the store with your existing customers on WhatsApp and Instagram, because the first orders usually come from people who already know you.
How long does it take to create an ecommerce website?
With products, photos and policies ready, most stores take 5 to 20 days with a developer. Larger custom builds take 25 to 35 days. In our experience, most delays come from steps 1, 6 and 7, not from the actual development. Start your payment gateway KYC and product spreadsheet on day one.
Must-have pages and features checklist
Use this list to check any store before launch, whether you build it yourself or hire someone:
Home page with your best products and a clear line on what you sell
Category pages with filters for size, price or type
Product pages with photos, price, variants, stock and delivery information
Cart and a short checkout with UPI, cards and COD
Order confirmation by email and, ideally, WhatsApp
Customer order tracking
Policy pages: refund, shipping, privacy, terms
About and contact pages with a real phone number
An admin panel where you can add products and see orders yourself
Nice to have later: discount codes, customer accounts, reviews, wishlists, abandoned-cart reminders and a blog.
Example: launching a small clothing brand
Here is how a typical launch plan looks for an Instagram clothing brand with about 60 products:
Week 1: business account and Razorpay KYC started, domain bought, product spreadsheet and photos prepared.
Week 2: Shopify store set up with a clean theme, size charts, COD limited to pincodes with low return rates, Shiprocket connected.
Week 3: policy pages written, test orders placed on two phones, small fixes, launch to Instagram followers with a first-order offer.
The same brand might move to a custom store a year later, once order volume and app costs grow.
The first 30 days after launch
Launch day is the start, not the finish. In the first month, watch three things. First, where visitors drop off: if many add to cart but don't pay, look at checkout steps, shipping charges and payment options. Second, which products get views but no orders: usually the photos or price need work. Third, what customers ask on WhatsApp: turn the common questions into product descriptions and FAQs.
Ask early buyers for reviews, reply to every message quickly, and keep adding products in small batches. A store that improves a little every week usually beats one that launched perfectly and never changed.
Do it yourself or hire a developer?
You can create an ecommerce website yourself on a store builder if you have a small catalogue, some time and comfort with settings. It's a good way to test an idea. Hire a developer when you need payments, COD rules, shipping and GST set up correctly the first time, when you want a custom design, or when your time is better spent on products and marketing. A good developer will also tell you when you don't need them.
Common mistakes we see
Launching with 500 products and weak photos instead of 30 great ones
Applying for the payment gateway at the last minute and waiting on KYC
No pincode or order-value limits on COD
Domain, hosting or store account in someone else's name
Testing only on a laptop, never on a phone with mobile data
Installing many apps or plugins on day one and slowing the store down
Keep your store safe
A store handles customer names, addresses, phone numbers and payments, so basic security is not optional. Use HTTPS on every page, which most platforms include by default. Never store card details yourself; let the payment gateway handle them. Use strong, separate passwords for the store admin, domain, hosting and payment dashboards, and turn on two-step login wherever it is offered. On WooCommerce, keep WordPress, the theme and plugins updated, and take regular backups. Give staff their own logins with limited access instead of sharing the owner account.
What it costs
At CodeXprime, a Shopify store starts at ₹15,000 and a custom Next.js store at ₹25,000, plus third-party costs such as the domain, hosting or Shopify plan, and payment gateway fees. The full breakdown is on our website development cost page.
Frequently asked questions
Can I create an ecommerce website for free in India?
Some builders let you start free, but you will still pay for a domain, payment gateway fees and usually a paid plan once you start selling seriously. A properly set-up store with your branding typically starts around ₹15,000.
Do I need GST to start an online store?
Many online sellers do, depending on products, turnover and where you sell. Ask your CA before launch.
Which payment gateway is best for a new store?
Razorpay is widely used by Indian stores and supports UPI, cards, netbanking and wallets. Compare fees and settlement times before you choose.
Can I sell on my website and on Amazon or Flipkart together?
Yes. Many brands use marketplaces for reach and their own website for better margins and repeat customers. Just keep stock in sync.
Do I need a mobile app as well as a website?
Not at the start. A fast, mobile-friendly website works on every phone without an install. Consider an app later, once you have many repeat customers who order often.
How do I get my first customers?
Start with people who already know you: existing customers, WhatsApp contacts and Instagram followers. Add search and ads once the store and reviews are in place.
Need help creating your store?
CodeXprime builds online stores for Indian businesses, with Razorpay, COD, Shiprocket and GST set up from day one. See our ecommerce website development service, read about Shopify development, or message us on WhatsApp with what you sell.
Written by Ritesh Kumar, founder and full-stack developer at CodeXprime. Ritesh has built online stores and payment platforms including Genuine Nutrition and Monark FX.